CodeBook Studio & Lab: Tutorial
Define a coding task once. Annotate in the browser. Benchmark LLMs against your labels.
1 Overview
Text annotation and LLM-based classification usually live in separate workflows. You build a codebook, hand it to annotators, collect labels, then start again from scratch when you want to test whether an LLM can replicate the same judgements. CodeBook Studio closes that gap: you define the task once, annotate in the browser, and export a codebook and labelled dataset that plug directly into CodeBook Lab for systematic comparison across model choice, model size, prompt style, zero-shot versus few-shot learning, and sampling hyperparameters — all benchmarked against your human labels.
This tutorial walks through each step:
- Prepare a CSV.
- Build a codebook in CodeBook Studio.
- Annotate your data in the browser.
- Export the codebook and labelled data.
- Run LLM experiments in CodeBook Lab and evaluate model performance against the human annotations.
2 What You Need
Before starting, you should have:
- a CSV file containing the texts you want to annotate
- at least one column containing the text itself
- optionally, a column containing a title, ID, headline, or other row label
You do not need to use fixed column names such as text or id. CodeBook Studio lets you choose which columns should be treated as:
- the text column: the main content to annotate
- the header column: the short identifier shown above the text during annotation
3 Prepare Your CSV
3.1 Minimum format
Your CSV only needs one row per text unit and one column containing the text to annotate.
For example:
| doc_id | title | text |
|---|---|---|
| 1 | Speech 1 | We need stronger climate action and more public investment. |
| 2 | Speech 2 | The proposal is too expensive and should be delayed. |
| 3 | Speech 3 | The minister welcomed the report but avoided committing to reform. |
This is often a good structure:
doc_id: a unique identifiertitle: a short label or headlinetext: the full text to annotate
3.2 Good practical rules
- Keep one observation per row.
- Keep the annotation target in a single text column.
- Keep IDs stable if you want to merge outputs back into other datasets later.
- Include a short header column if the texts are long, because it makes navigation easier during annotation.
3.3 What CodeBook Studio will add later
When you start annotating, CodeBook Studio adds new columns to hold annotation outputs. Their names are constructed from the section name and annotation name in your codebook.
That means the uploaded CSV does not need annotation columns in advance.
4 Start in CodeBook Studio
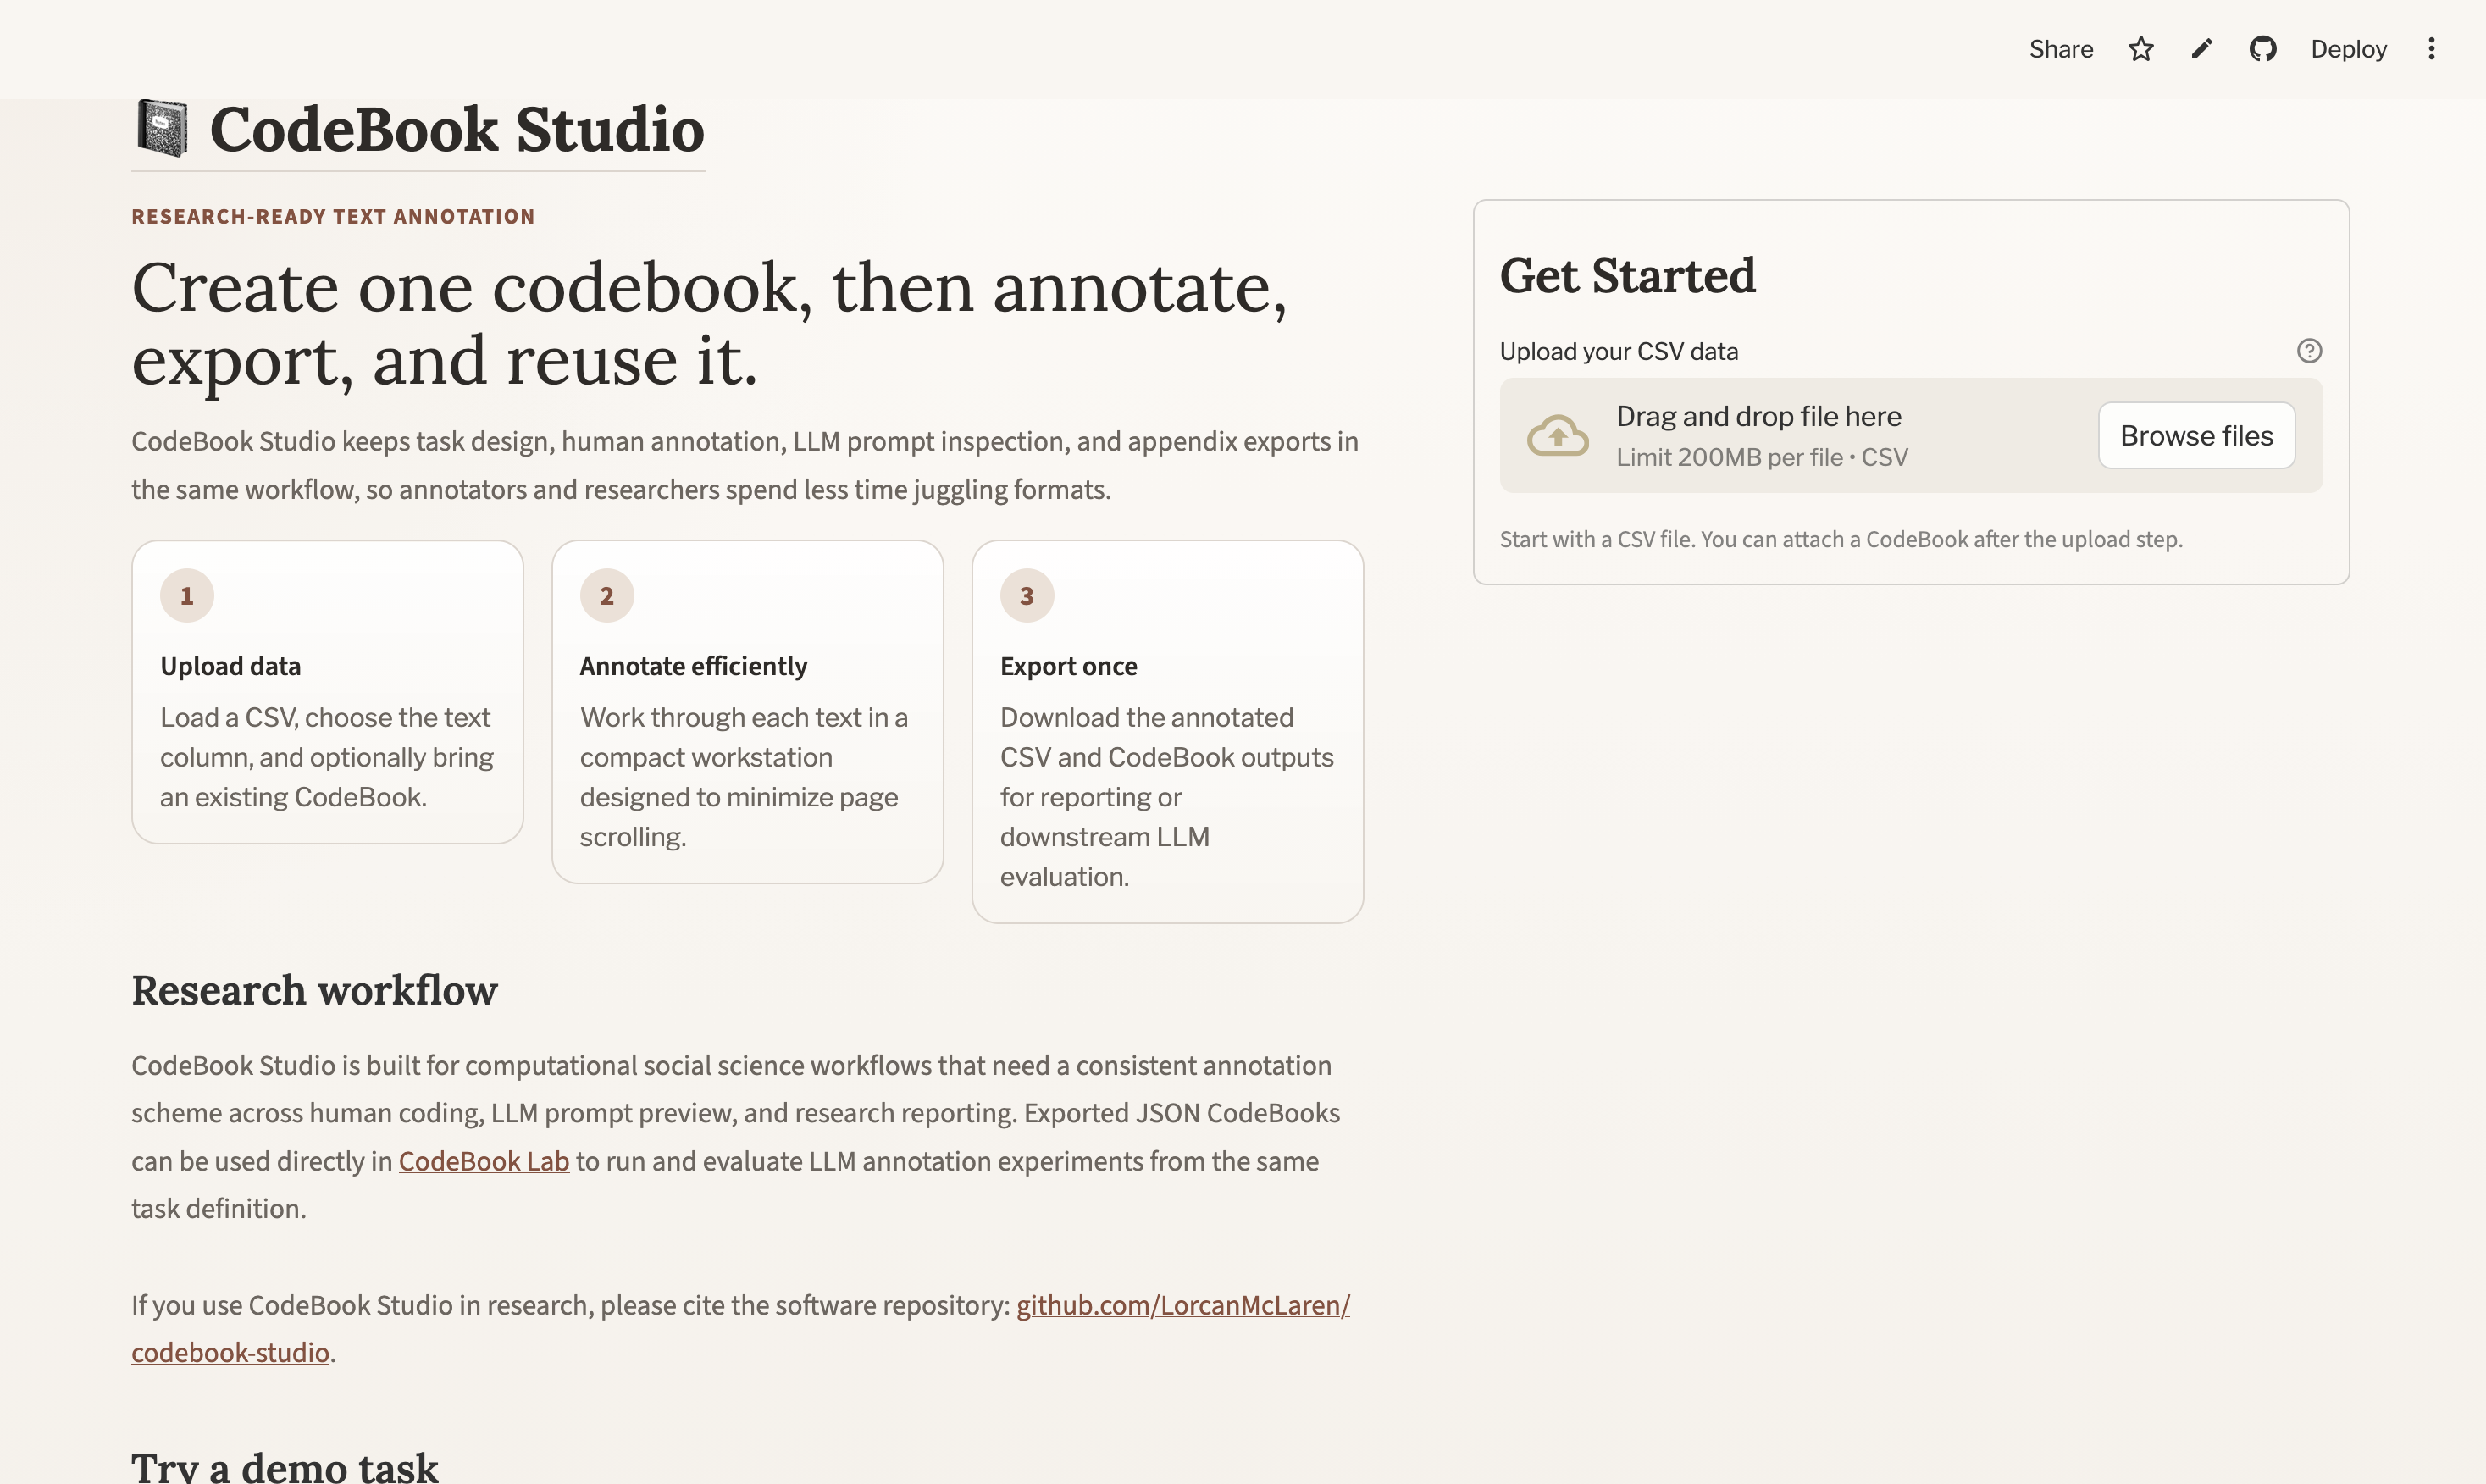
Open CodeBook Studio and go to the landing page.
You will see:
- an upload area for your CSV
- an optional upload area for an existing codebook JSON file
- a main action button that changes depending on what you upload
4.1 Two common starting points
4.1.1 Option 1: Start from raw data
If you upload a CSV without a codebook, the main button becomes Create CodeBook.
This is the usual path when you are designing a task from scratch.
4.1.2 Option 2: Start from an existing codebook
If you upload both:
- a CSV
- a previously exported
codebook.json
the main button becomes Start Annotating.
This is useful when you want to:
- reuse an existing annotation scheme
- continue annotation on new data
- resume a task definition that already exists
5 Build a Codebook
If you start with a CSV only, CodeBook Studio will take you to the codebook editor.
The codebook defines:
- which column is used as the header
- which column is used as the text to annotate
- how annotations are grouped into sections
- what questions annotators answer
- what response formats are valid
- what instructions and examples support each annotation
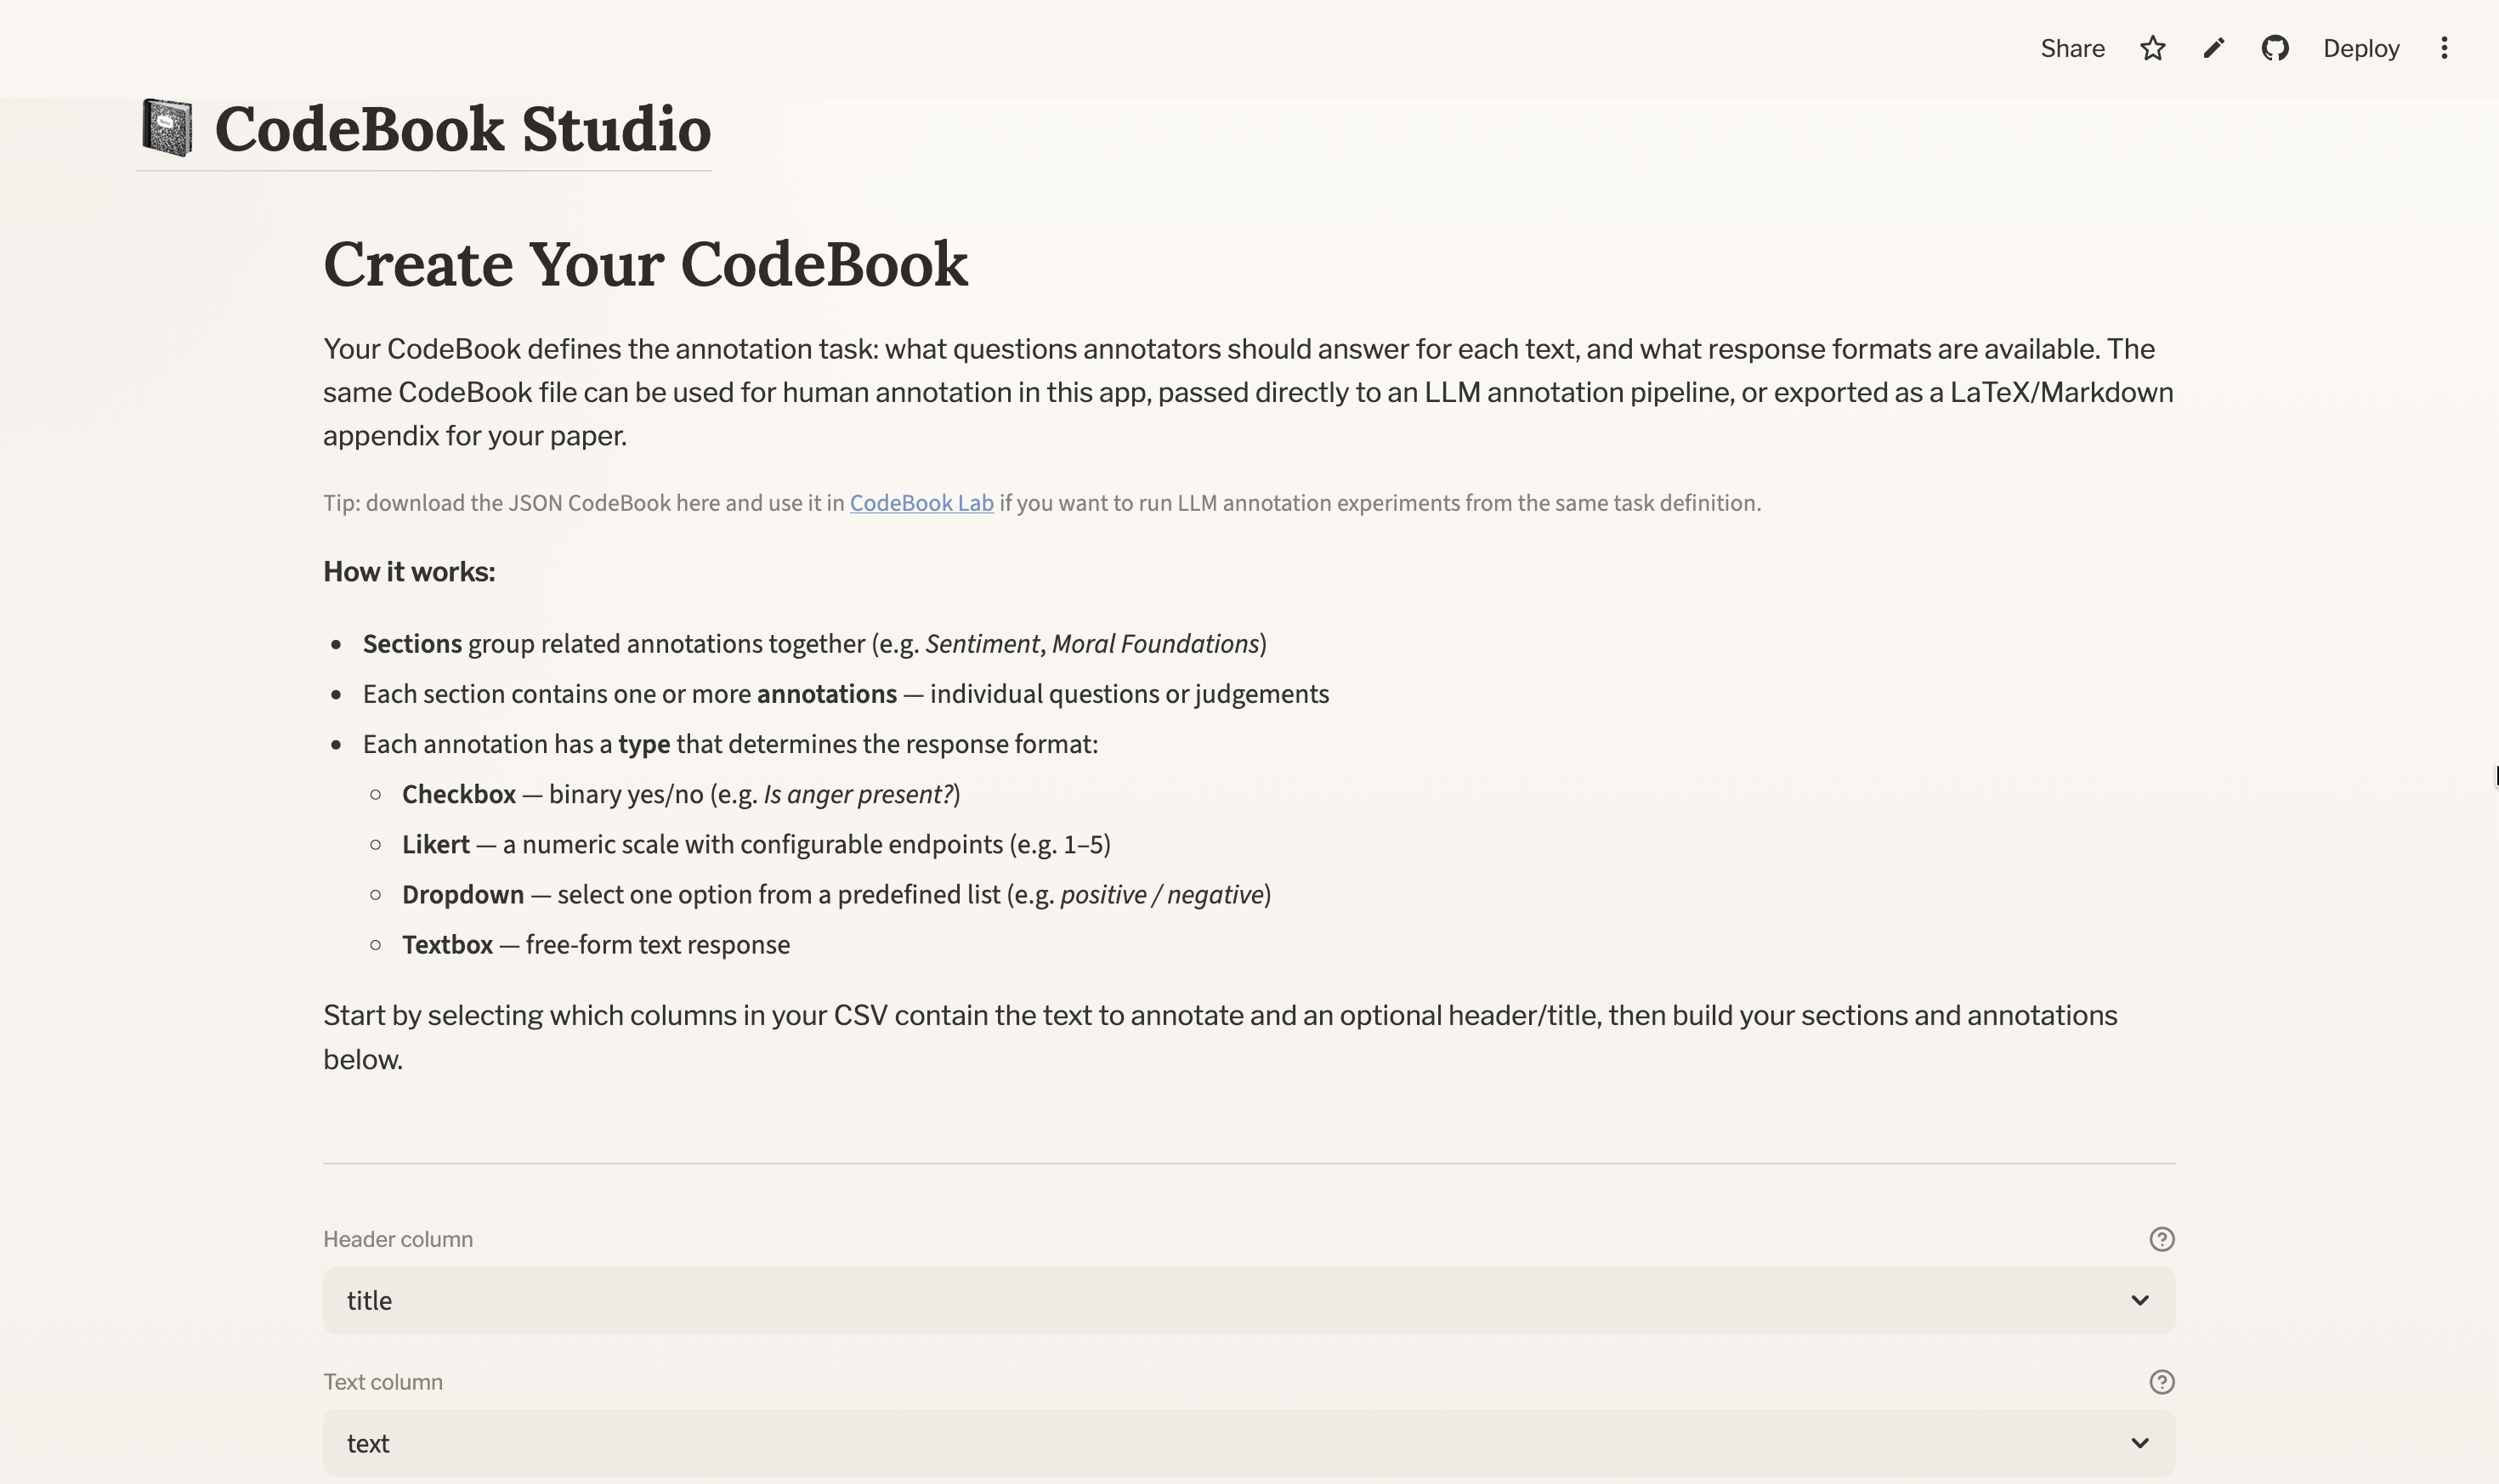
5.1 Choose the header and text columns
At the top of the codebook editor, select:
- Header column: the short label or identifier shown during annotation
- Text column: the actual text the annotator will read
The preview updates from these choices immediately, so this is the first point where you can check that the right text is being shown.
5.2 Add sections
Sections help organise related annotations.
For example, you might create a section called:
SentimentPolicy PositionEnvironmental ImpactsMoral Foundations
Each section can also include section instructions. These appear in the annotation interface and are automatically incorporated into the LLM prompt when the task is run in CodeBook Lab.
5.3 Add annotation items
Inside each section, you add one or more annotation items.
CodeBook Studio currently supports four annotation types:
- Checkbox: binary yes/no judgement
- Dropdown: select one option from a predefined list
- Likert: choose a value from a bounded numeric scale
- Textbox: enter a short free-text response
Each annotation item should have:
- a clear name
- a useful description
- any type-specific settings it needs
For example:
- a dropdown needs a list of valid options
- a Likert item needs a minimum and maximum value
- a textbox needs no extra response settings
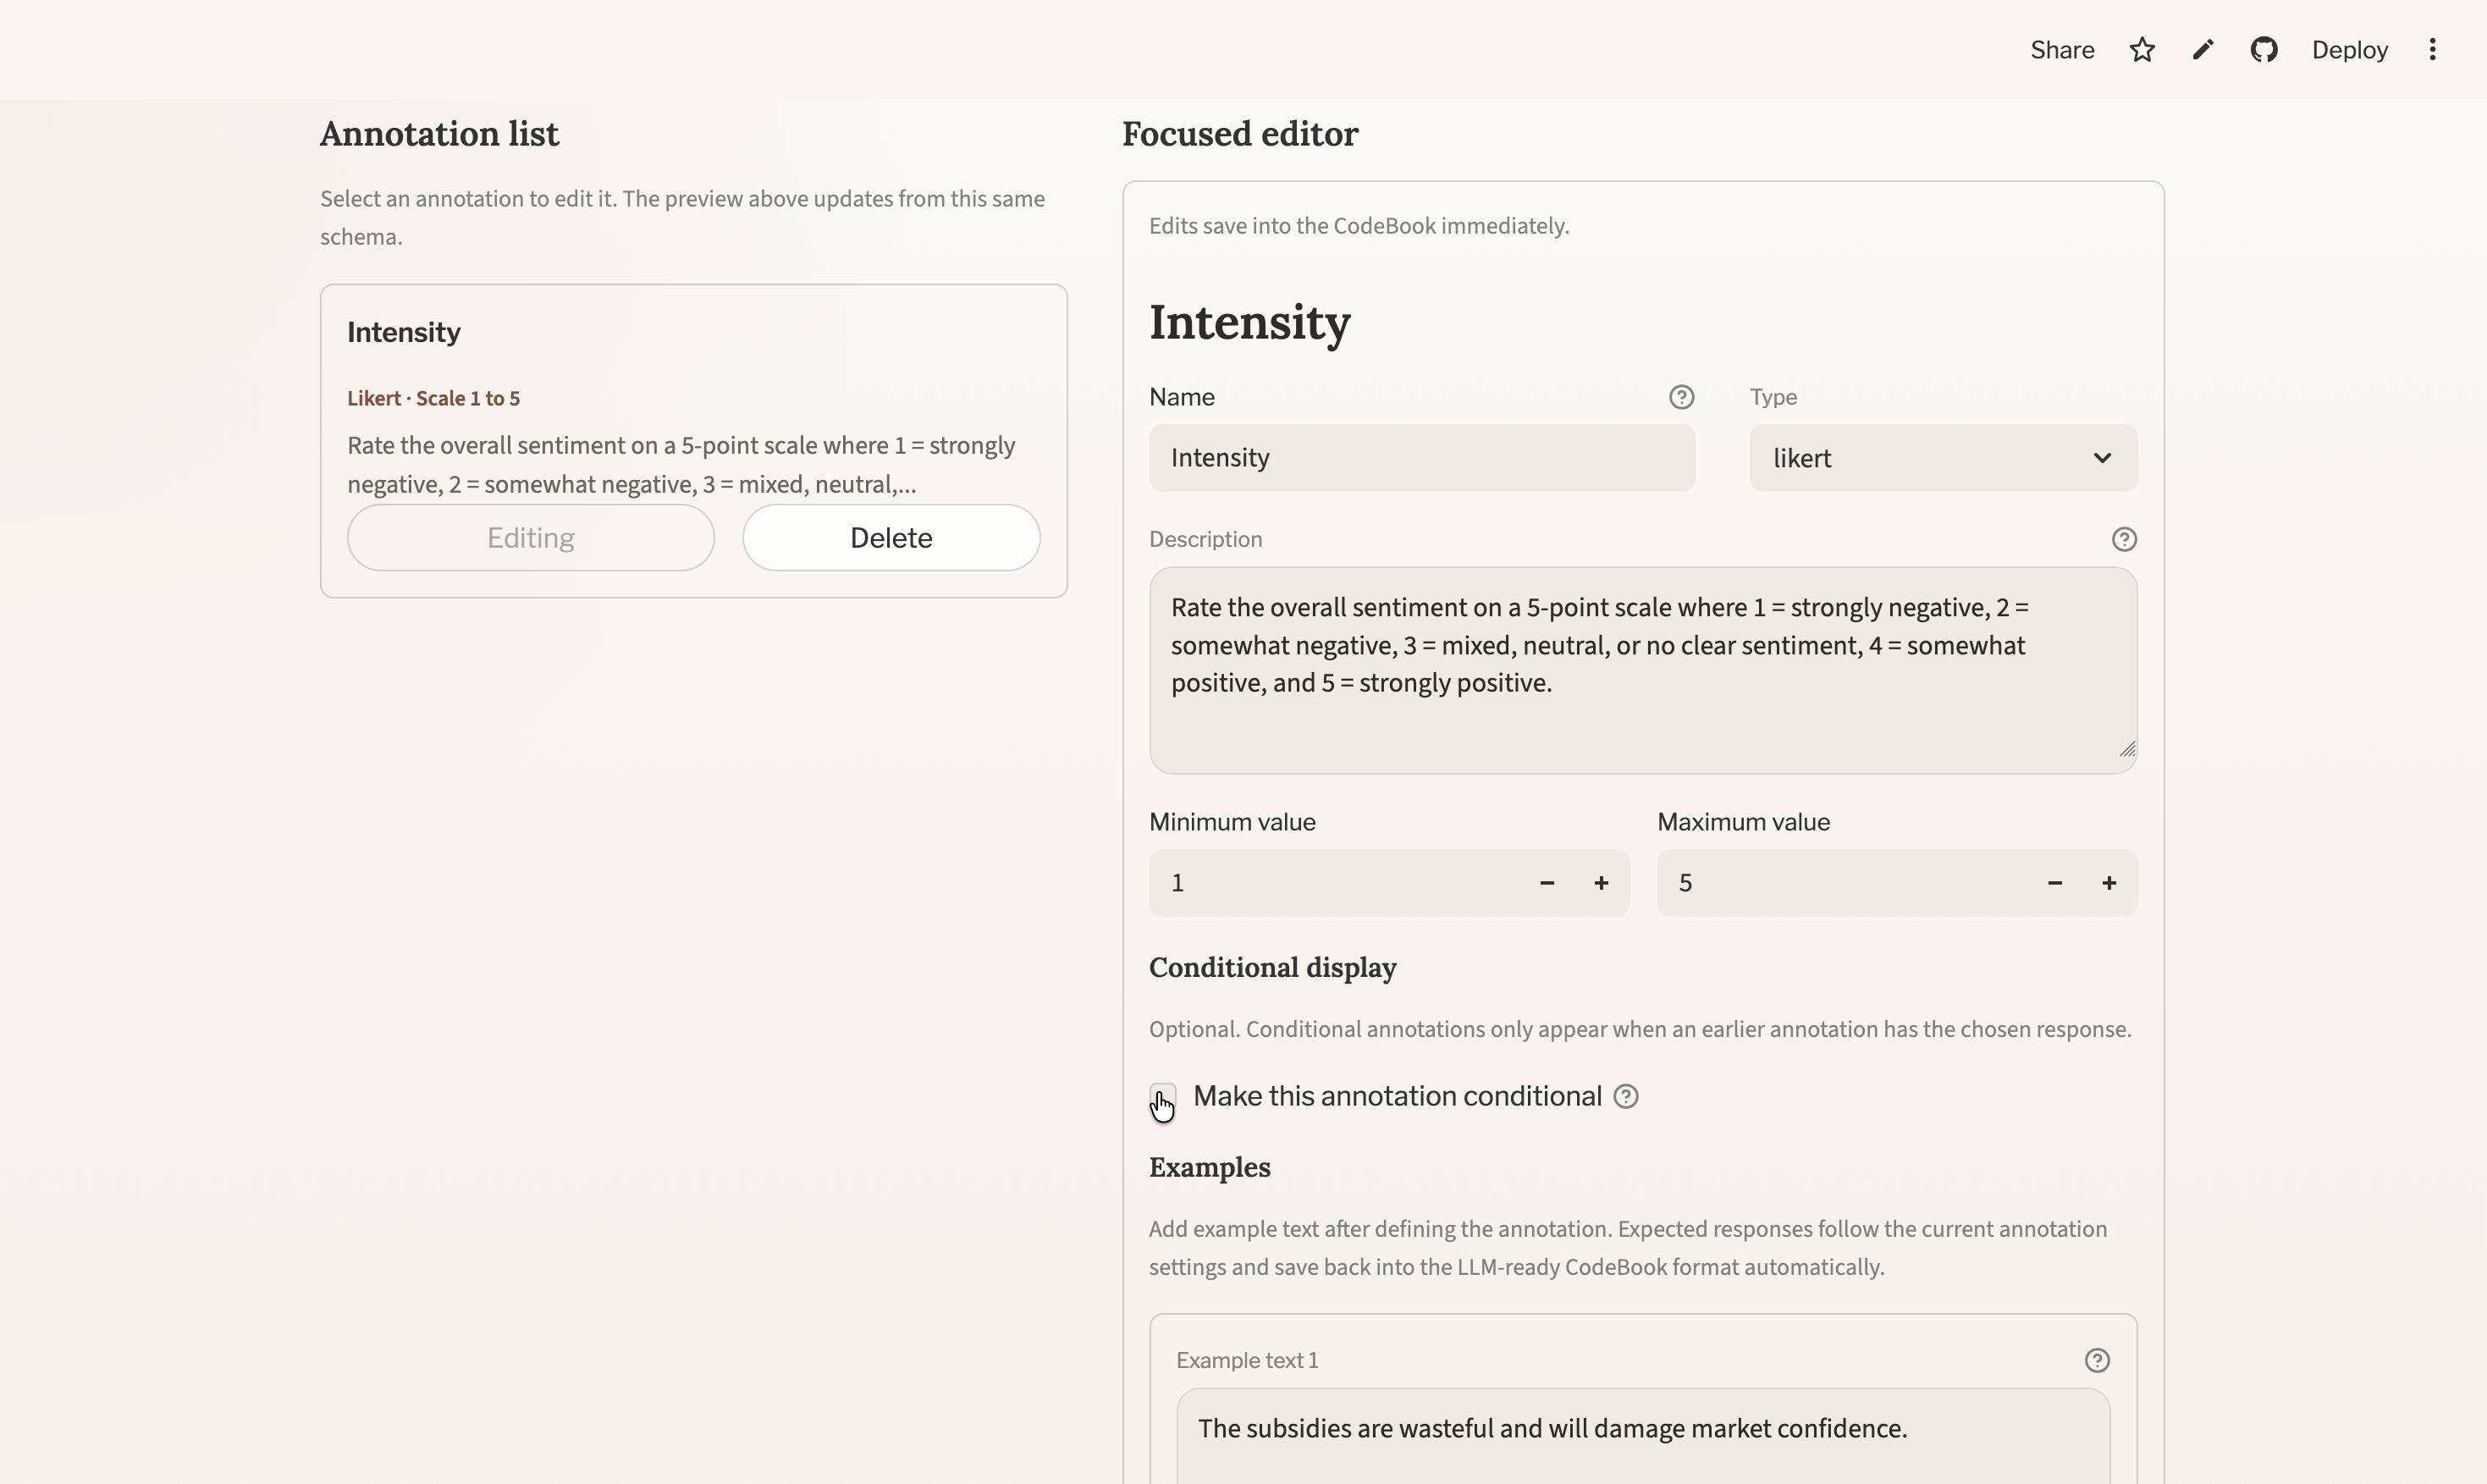
5.4 Add examples after the annotation is defined
In the focused editor, examples come after the annotation definition itself. This is deliberate: it lets you define the valid response space first, and then attach examples that use valid responses.
For example:
- checkbox examples can use only
YesorNo - dropdown examples can use only the listed dropdown options
- Likert examples can use only values inside the configured scale
This makes examples more reliable for both human annotation and downstream LLM prompting.
5.5 Use the workflow preview as your QA surface
One of the most useful parts of the editor is the Annotation Workflow Preview above the builder.
Use it to check:
- whether the right text column is showing
- whether the section names are intuitive
- whether instructions are too long or too vague
- whether examples make sense
- whether annotators will see a clean, compact interface
If something feels confusing in the preview, it will probably feel confusing in the real annotation flow too.
6 Move Into Annotation
When your codebook is ready, click Start Annotating.
CodeBook Studio will create the annotation columns it needs and take you into the annotation workspace.
6.1 What annotators see
The annotation interface is designed around a compact two-column layout:
- Left pane: the text being annotated
- Right pane: the currently active annotation section
At the top, there is a navigation bar showing:
- the current item
- progress through the dataset
- previous/next navigation
Within the section pane, annotators work through section instructions, annotation widgets, and optional examples. The app autosaves session state as you navigate, so you can resume later from the landing page.
6.2 Tips for efficient annotation
- Keep section instructions concise.
- Use examples sparingly but strategically.
- Break large tasks into sections so annotators only focus on one cluster of judgements at a time.
- Use the header column to help orient annotators when the texts are long or similar.
7 Export Your Outputs
Once you have annotated your data, open Utilities in the annotation flow.
You can download:
- Annotated Data: downloads as
ground-truth.csv - CodeBook: downloads as
codebook.zip, containingcodebook.json,codebook.md, andcodebook.tex

The JSON and CSV are what CodeBook Lab needs. The Markdown and LaTeX exports are mainly for documentation, appendices, and reporting.
8 Move the Task Into CodeBook Lab
Create a local task folder and copy the two exported files into it:
tasks/<task>/
├── ground-truth.csv
└── codebook.json
You can name the task folder however you like. For example, if your project is about climate speeches, you might use tasks/climate-speeches/; if it is about manifesto pledges, you might use tasks/manifesto-promises/.
CodeBook Lab reads the task definition from codebook.json and the human labels from ground-truth.csv. Before sending text to the LLM, it automatically strips out the annotation columns, so the model sees only the original text. The human labels are then used as ground truth when scoring model performance.
9 Configure Experiments in CodeBook Lab
The most straightforward way to use CodeBook Lab is to start with a single experiment, inspect the results, and only then move on to larger comparisons.
Install the package, make sure Ollama is available, and then run experiments from Python.
Typical local run steps look like:
python3 -m venv .venv
source .venv/bin/activate
pip install --upgrade pip
pip install codebook-lab
ollama serve
If your task includes textbox annotations and you want the full textbox metric suite, install the optional extras instead:
pip install "codebook-lab[textbox]"9.1 Start with one experiment
For most users, the best first step is one simple run against one task and one model.
from codebook_lab import ExperimentSpec, run_experiment

result = run_experiment(
    ExperimentSpec(
        task="<task>",
        model="gemma3:270m",
        use_examples=False,
        prompt_type="standard",
        temperature=None,
        top_p=None,
        process_textbox=True,
        country_iso_code="USA",
    ),
    task_root="tasks",
    output_root="outputs",
)

print(result.experiment_directory)
print(result.metrics.summary_text)
This is enough to answer a basic question such as: How well does one local model reproduce my human labels on this task?
9.2 Compare multiple experiments
Once a single run is working, you can scale up to structured comparisons. A common next step is to compare:
- two or more models
- zero-shot versus few-shot prompting
- different prompt wrappers
- different temperature or top-p settings
One clear way to do that is to define a small list of experiment specifications:
from codebook_lab import ExperimentSpec, run_experiment_grid

specs = [
    ExperimentSpec(
        task="<task>",
        model="gemma3:270m",
        use_examples=False,
        prompt_type="standard",
        country_iso_code="USA",
    ),
    ExperimentSpec(
        task="<task>",
        model="gemma3:270m",
        use_examples=True,
        prompt_type="standard",
        country_iso_code="USA",
    ),
    ExperimentSpec(
        task="<task>",
        model="llama3.2:3b",
        use_examples=False,
        prompt_type="persona",
        country_iso_code="USA",
    ),
]

results = run_experiment_grid(
    specs=specs,
    task_root="tasks",
    output_root="outputs",
)

print(f"Completed {len(results)} runs")
Because the codebook and labelled data stay constant across runs, you can isolate the effect of each choice and compare every setup against the same human labels.
If you want to iterate through many combinations at once, you can also use a parameter grid:
from codebook_lab import run_experiment_grid

results = run_experiment_grid(
    param_grid={
        "country_iso_code": "IRL",
        "tasks": ["policy-sentiment"],
        "models": ["gemma3:270m", "llama3.2:3b"],
        "use_examples": ["false", "true"],
        "prompt_types": ["standard", "persona"],
        "temperatures": ["None", "0.2"],
        "top_ps": ["None"],
        "process_textboxes": ["true"],
    },
    output_root="outputs",
)

print(f"Completed {len(results)} runs")
9.3 Add a custom prompt style
If the built-in prompt wrappers are not enough, you can register your own.
This is useful when you want to test a specific instruction style, persona framing, or response structure that fits your substantive domain.
from codebook_lab import (
    ExperimentSpec,
    PromptContext,
    register_prompt_wrapper,
    run_experiment,
)

def concise_wrapper(context: PromptContext) -> str:
    return (
        "You are helping with a social science annotation task.\n\n"
        f"{context.core_prompt}\n\n"
        f'Text:\n"{context.text}"\n\n'
        "Return JSON only.\n"
    )

register_prompt_wrapper("concise", concise_wrapper)

result = run_experiment(
    ExperimentSpec(
        task="<task>",
        model="gemma3:270m",
        prompt_type="concise",
        country_iso_code="USA",
    ),
    task_root="tasks",
    output_root="outputs",
)
This makes it possible to test not just different models, but different theories of prompting.
If you are using a cluster or remote machine, you would adapt the same Python calls to your batch or job-scheduler workflow instead.
10 Inspect the Outputs
Each CodeBook Lab run creates a timestamped experiment directory under outputs/<task>/.
Typical outputs include:
output.csv: row-level model annotationsconfig.json: run configurationclassification_reports.txt: evaluation summariestiming_data.json: inference timingchar_counts.json: prompt and response character countsemissions.csv: CodeCarbon tracking output
Aggregate metrics are also appended to:
outputs/metrics/<task>_metrics_log.csvThis lets you compare model performance not only in terms of annotation quality against human labels, but also in terms of runtime, prompt/response length, energy consumption, and emissions.
11 Common Pitfalls
11.1 Using the wrong text column
If the wrong column is selected, both human annotators and the LLM will be reading the wrong content. Always confirm the text column in the codebook editor preview before starting annotation.
11.2 Renaming exported files
CodeBook Lab expects ground-truth.csv and codebook.json by name. If you rename these, the workflow becomes harder to reproduce and document.
11.3 Letting examples drift from valid responses
Examples are most useful when they obey the same response logic as the annotation item itself. Define the response type and valid response space first, then add examples.
11.4 Making instructions too long
Detailed guidance is useful, but very long instructions can slow both human annotation and prompt interpretation. Try to keep the core decision rule visible quickly.